
Frank da Cruz
Columbia University
As of: ilosetup 1.15 / Mon Feb 7 13:14:21 2011
|
|
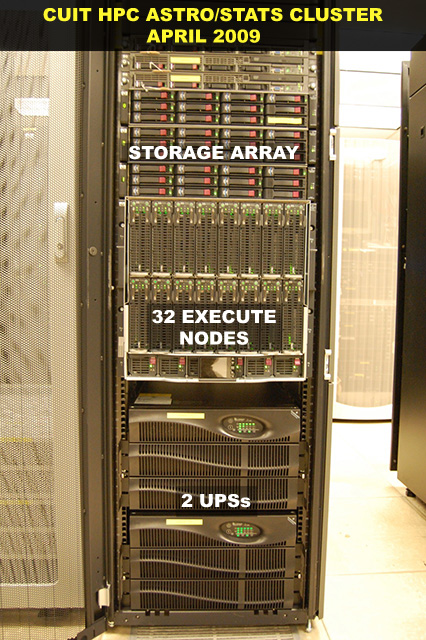
| Photo by Megan Pengelly-Anderson |
The HP blade servers are set up and configured through an "Onboard Administrator" called Integrated Lights-Out (iLO), which is part of the machine itself, and not dependent on any operating system or other software. A Web-based GUI management tool is provided for manual configuration, testing, and monitoring of the blades, and there is also a text-mode "back door" accessible by Telnet (in iLO 2 but not iLO 3 and later) or SSH that provides a traditional command-line management interface.
When a company finds itself installing dozens or hundreds of blade servers, manual configuration through the Web interface is prohibitively repetitive, labor-intensive, and error-prone.
The task can be handled more efficiently and with less risk by using a program that automates the configuration dialog with each blade to yield a consistent configuration across any number of blades. A good tool for doing this is C-Kermit because it is designed specifically for automating dialogs across communications connections, including Telnet and SSH.
Two iLO configuration scripts have been written for C-Kermit, to be used on any reasonably modern Unix-based computer (Linux, Mac OS X, NetBSD, Solaris, HP-UX, AIX, etc). These scripts have been used to set up the 200 blade systems that have arrived so far and, according to the Senior Systems Engineer in charge of the deploying the blades, "we plan on using it for all future HP purchases - blade and otherwise. The primary advantages of this script are that we no longer need to attach a monitor and keyboard to each machine to manually configure the iLO – adding users, enabling ssh, configuring hostnames."
The main script, ilosetup, configures a blade (or any other HP server that has iLO). It needs to know the IP hostname for the blade and the username and password to create on the blade. It can also be given various option parameters.
The second script is ilodomany which simply executes ilosetup a number of times in sequence; once for each hostname given on the command line. This is so the created user ID and password do not need to be hardwired into the script or stored on a disk, or entered manually for each server. Instead, the access info is given once to ilodomany and then passed to each instance of ilosetup in a relatively secure manner.
")
|
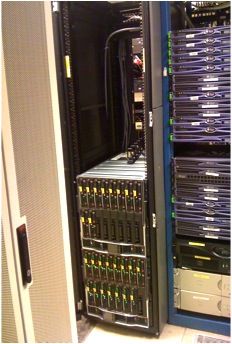
| Photo by Stew Feuerstein |
By convention, the iLO Console must be registered as hostname-console. So, for example, if the server's IP name is SERVER123.CC.COLUMBIA.EDU then the iLO Console's IP name is SERVER123-CONSOLE.CC.COLUMBIA.EDU.
If you start ilosetup without any command-line arguments you get a usage message like this one:
The options are:Usage: [ ilo_username=x ] [ ilo_userpass=y ] ilosetup hostname [ options ] Options: 1. bios 2. connect 3. debug 4. help 5. iloonly 6. nopassword 7. nopoweroff 8. noraid 9. noreset 10. notelnet 11. poweroff 12. pwrmode 13. quiet 14. raid 15. reset 16. ssh 17. telnet 18. usepassword 19. verbose Default options: verbose nopoweroff telnet reset usepassword raid Optional environment variables: ilo_userid: user ID to create ilo_userpass: password for user ID DEBUG=1: turn on debugging If created user ID and password are not found in the environment, you are prompted for them.
| quiet | Silent running, suitable for a cron job |
| verbose | (default) The configuration dialog is shown on the screen. |
| connect | Instead of configuring the server, the script logs in automatically to iLO and, if successful, presents an interactive iLO console session to the user. |
| bios | Like connect, but takes you to the BIOS rbsu> prompt for an interactive BIOS session. It's your responsibility to get out gracefully. |
| debug | For use when testing or debugging the script. |
| telnet | (default) Try to connect with Telnet first and if that doesn't work try ssh |
| ssh | Try to connect with ssh first and if that doesn't work try Telnet. NOTE: In iLO 3 Telnet is gone; you must specify ssh. |
| notelnet | This says that the host does not support Telnet at all, so don't try to connect to it with Telnet (i.e. use only ssh), and don't try to set any Telnet-related configuration parameters. |
| usepassword | Use password from serials file for console login. |
| nopassword | Use a blank password for console login. |
| iloonly | Only do iLO commands, no BIOS or RAID configurations (which require the server be rebooted). This option can be run without disturbing the server. |
| raid | Configure RAID. This is like reformatting the disks, everything on them will be erased. Requires prior power cycle. A logical RAID 1 disk is configured from Physical Disks 1 and 2, if and only if Physical Disks 1 and 2 exist and there is not already a Logical RAID-1 Disk 1. |
| noraid | (default) Skip the RAID configuration. |
| poweroff | Power the host off when finished. |
| nopoweroff | (default) Don't power the host off when finished. NOTE: currently, the host is always powered off prior to giving BIOS commands, otherwise it is not possible to reach the BIOS. The nopoweroff option does not inhibit this. The only way to run this script without the server being power cycled is with the iloonly option or with the connect option. |
| reset | (default) Reboot iLO when finished (new iLO settings don't take effect until iLO is restarted). |
| noreset | Don't reboot iLO. |
| pwrmode:n | Change the power regulator mode. The value of n must be 1, 2,
3, or 4:
1 = Dynamic power savings modeThis option is "standalone" in the sense that no other configuration commands are given during the session. Power is cycled before and after because it must be. |
The password options, usepassword and nopassword, are because sometimes a blade is delivered with a blank console password instead of the password that the manufacturer claims to have assigned. The 'usepassword' option (default) means to try the factory-set password taken from the serials file first, and if that doesn't work, to try a blank password; the 'nopassword' option means try a blank password first, and if that doesn't work, try the password from the serials file.
As noted, the created username and password are picked up from environment variables ilo_username and ilo_password, if defined; otherwise the script prompts for them. Then it looks up the host in the serials file to get the iLO access password. Then it makes an SSH connection to the blade and runs through the configuration dialog, checking each operation for success or failure, and logging everything that happens. At Columbia, the configuration goes as follows:
As delivered, the blades have Telnet disabled and SSH enabled. However some problems have been noted with the iLO SSH implementation so Telnet is preferred here. Therefore the first time the script is run on a blade, SSH is used, but then the script itself enables Telnet, so subsequent accesses can be with Telnet.iLO 3 does not support telnet. However, unless instructed otherwise ilosetup tries first to connect with telnet and when this fails, it tries SSH. The script still works but an unnecessary and fruitless step is taken on iLO 3 boxes. Include the 'notelnet' option on the command line to avoid it. If desired the script can be changed to always try SSH first.
The exit status is 0 if the script succeeded, nonzero if it failed.
where xxx is the simple hostname. The first one just shows the connection and login process, to be checked in case the script failed to connect or authenticate. The second one is a log of the dialog with the iLO console after logging in.xxx-connect.log xxx-session.log
The logs are regular Kermit session logs, transcripts of characters that were received from the server during the session, intermixed with lines that start with “%%” that are progress messages from the script itself, which can be grepped for a quick summary of the run:
grep ^%% fillmore-session.log
In C-Kermit 8.0, the logs contain everything that came in, including escape sequences. With C-Kermit 9.0, the escape sequences are stripped out.
| ilosetup | ilodomany |

| 
|
This script was written for C-Kermit 8.0.212 Dev.28, an internal working copy that is to be released as C-Kermit 9.0, which is much better adapted to modern platforms than the previous release (8.0.211 of April 2004). The iLO scripts use several features that are new to this version:
| FSEEK /FIND:string | Seeks to the spot in a file opened by FOPEN that contains the specified string. In earlier Kermit versions this would be accomplished by reading the file a line at a time and checking each line for the string. |
| The \fkwval() function | This is a handy way to parse strings of the form foo=bar; it creates a macro named foo with the value bar (foo could be any single word, bar can be anything at all, and "=" is the default separator but others, such as ":" can be specified). |
| The PUTENV command | This is what allows ilodomany to pass the created user ID and password to ilsosetup in a secure manner: they are not stored in any file, nor do they appear on the command line where they might be seen with the Unix 'ps' or 'w' commands. |
status=2or:
status_tag=COMMAND PROCESSING FAILED
error_tag=COMMAND SYNTAX ERROR
status=0thus allowing the script to easily check whether a command succeeded or failed, and if it failed, to get the error message. All Kermit has to do is check the value of its dynamically created STATUS macro, and if it isn't 0, then its ERROR_TAG macro will contain the message. (Unfortunately, this model is not used consistently throughout the iLO console and its subsystems, which makes the script somewhat inelegant in spots.)
status_tag=COMMAND COMPLETED
Global settings modified.
These new features are not yet in Kermit 95 (the Windows version of C-Kermit) because they were added after the most recent K95 release. In any case, as written, the scripts might depend on some Unixisms.
iLO and RBSU commands are issued by macros that take care the error handling according to each command, because not all errors should be fatal; for example if the created ID already exists, that's not a fatal error. The RBSU command macro, as noted, takes extreme measures to get the command to its destination despite the traps and pitfalls of the multi-leg communication pathway.
As always, C-Kermit depends on the external ssh client to make SSH connections. All modern Unixes should have this client; if not, it can be downloaded from here. C-Kermit's Telnet client is built-in.
The ilosetup script was adapted to these changes in such a way that it still works with iLO 2. When the connection is made, the script extracts the iLO version number from the greeting herald, and uses it to decide when do something special for iLO 3.
$ chmod +x ilosetup ilodomanyand you have to change the top line of the script to indicate the path of the C-Kermit program (8.0.212 or later) that will execute it, e.g.:
#!/usr/local/bin/kermit +(in C-Kermit the '+' is required to indicate that command-line arguments are to be processed by the script and not by Kermit itself, as explained in the Kermit Scripting Tutorial.)
To use the iLO scripts at a new site: